30 June 2012

if you give kate a garden you will have to...

Add lawn furniture. So I have been REALLY craving some sort of bistro set for the outdoor area BUT everything seemed really expensive. Until I rolled into this... ONLY $29 for the chair and $8 for the table


This was one of my weekend projects and I was SO proud when I assembled it myself.


Looks comfy, eh?

Perfection.
So here are some before shots of our back rectangle.

view to the right (if looking out from my door)

garden that isn't really growing.

view to the left of our back rectangle.
And some AFTER shots!
Don't you just want to hang out!

Who wants to come and be the first person to sit and have a life chat with me?

my garden...

So with my new back yard (or what I like to refer to as our back rectangle) I was really excited at the potential of a garden.

OK to be honest the idea only came to me when I saw this "as seen on TV" item (Ive NEVER seen it on TV).

Roll it out?!!?

Looks very strange.

Add Gnome. (Not a required step)
It's been "growing" for about two weeks now... and nothing is happening but I am still excited about it!

29 June 2012

caution: dan @ work.

Dan came over and saved my life following a latex paint emergency (I didn't have an mineral spirits to clean so I had green hands)!

And he got to work!

He stained our kitchen chairs! They previous looked something like this
ikea.com


Dan at work!

And now they look MUCH darker.
I think this chair staining was my FAVORITE project. Since in the end there were no SNAFUs!

28 June 2012

refinishing the coffee table..

This was actually the project that started it all...I wanted to rework this table a little bit since it had seen some better days.

It is totally real wood so that made the finishing a bit harder but still exciting.

table before... see the wear and tear.

lots of splotches.
My dad gave me the four step process:
#1: Sand (200 or 300 grit).
#2: Use a tack rag (I had never heard of one but now I LOVE it
#3: Stain... I used Minwax Early American... you just take a rag and wipe it on, let sit for 15 minutes and wipe off anything that hasn't absorbed. 
#4: Finish it... I used Minwax wipe on poly! 


So in the end, it isn't perfect but I was able to minimize the splotches... or at least try and match the finishes a bit more that it was.
after.

   
fter.

27 June 2012

the bookshelf project

This project was quiet the headache. At first I simply wanted to re-do some Ikea furniture. So I went where everyone should go... blog land research!

I got some tips from:

The Purple Pea

and

Apartment Therapy 

and a lot of help from my dad!


And I got to work. Sadly, this project became very stressful and success is still pending.


It all started with a wonky primer.

this is what primer should NOT do.

stupid primer.
The people at Home Dept were SHOCKED at the bad primer. So this resulted in me having to acetone/scrape off the bad primer and start over with new primer ($$).

In the end I got the primer on and dry... Day two I started to paint (I even experimented with my air compressor).
That was an adventure.
And in the end I completed two book shelves. They are still curing so I won't use them until Friday.

The first one probably looked something like this in it's former life (see below).

courtesy of flickr
Only mine was a tan wood color.

And now it looks something like this:
oh. ah.
This navy blue one was a real pain in the but. The rollers weren't working. The paint was really sick. And I was ready to throw in the towel (don't judge... I didn't even purchase this bookshelf it was passed along to me).

But hopefully it will be fine by Friday and ready to hold my cards and goodies in my room.

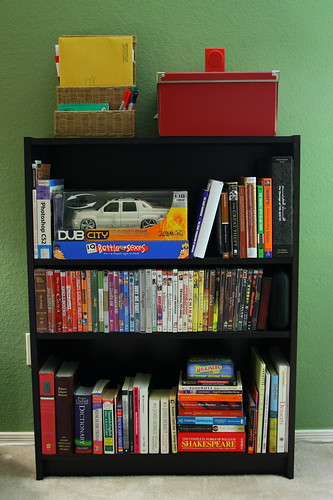
The bigger project was the overhaul on something that probably originally looked like this:

ikea.com
But we wanted it to match our bulletin board...

bulletin board (duh).
So this is the new bookshelf!

Again, now I am just waiting for these suckers to dry/"cure" and hopefully they will be back in action holding our movies and book collection!

Summary in numbers:

Quarts of primer purchased: 3 (when only 1 should have been needed)
Shelves total: 5
Rrollers: 3 (should have bought more)
Blisters trying to open acetone container: 3
Times I called home: 11
Times I cried: 6

26 June 2012

if you saw a big button would you push it?


before I adventured to my DIY weekend... Dan, Tomás and I went on our own adventure. 

We had hear about this mysterious button in downtown Houston.

If you saw a strange button would you push it!

Well, we found it! and we did!
button.

big burp. 
To read more about the big burp... click here

We ended our adventure by riding the Ferris wheel at the downtown aquarium AND checking out all the neat things going on (latin beats)!


And would you look at who is sliding down the stairs.... this little fellow was won by Tomas and Dan (in one of those silly carnival games)!


busy bee this weekend

my smallest of weekend projects.
Gee Wiz, I was a busy bee this past weekend. I did an assortment of projects (some are still drying) that I will updated you on through the week!

These projects included:
painting an ikea bookshelf
painting a smaller ikea bookshelf
staining our dining room chairs
refininishing our coffee table
making two Adirondack chairs and a table for the outdoor area!

and

this mini project up above... awhile back Tomas and Dan and I worked on this crazy puzzle. I loved the image so much that I framed it! And I plan on putting it in my office/workspace once things settle down in the school (we are having a lot of construction).

22 June 2012

photo dump!

my first ever etsy purchase... i shipped it off! (sold one hour after opening the store)

empty bowls. Mackenzie and I went!

Mackenzie's fake birthday celebration (not for another month or so).

A ceiling tile I worked on!

20 June 2012

art final.

finally finals!

the kids produced some AWESOME work throughout the year. and their finals were just as impressive.

the assignment was to make something and present on an artist. for their project they had to make a recreation of a famous work from their artist using different tools than the artist OR create an original piece using the same style and materials as the artist (think paint a drawing OR paint a landscape in the style of monet).

here are some sample works.

Acrylic Painting, 28x 36, Inspired by Roy Lichtenstein

Acrylic Painting, 11x14, Inspired by Van Gough

Acrylic Painting, 24 x 24, Inspired by Walt Disney (Fantasia)

Wood Burning and Wood Stain, 30 x30, Inspired by Pablo Picasso

Jelly Beans on wood, 12 x12, Inspired by Van Gough

Colored Pencil, 14 x 22, Inspired by Alex Grey

Make up! 12 x 16, Inspired by Judith Geher

18 June 2012

happy father's day!

happy belated father's day (didn't get on my blog yesterday).

to the greatest dad.

who lets me climb up our chimney
dares me to keep dreaming bigger
and taught me how to be an artist!

you are the best!

this little piggy went to the court house.

i made this pig for Tomás' mom. it was inspired by a pig she had seen made for her daughter, a nurse...

the task was to create a "court" or "judge" related piggy bank.

face!

I tried to make the name look like the court building.

butt (he he he)

Side.

insert money here!